Setting up a draft beer system for your home brewed beer is easier than one might think. If you are an experienced home brewer and you have already started kegging your home brewed beer in Cornelius kegs, or if you are considering moving to the kegging stage, it is time to start thinking about the next step - serving your very own draft beer. With just a few hours worth of work, you can transform your spare room or garage into a place where you can enjoy fresh drafts of your own home brewed beer.
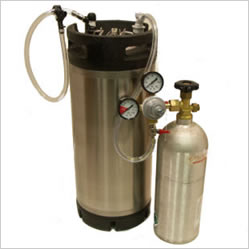
The first step of this process is to have your kegging system ready. Whether you use pin lock, ball lock, or a tap system, you want to have brewed into your keg at least a couple of times before moving to a draft beer system. It is always good too work out the kinks in a process before you move on to something new.
Next, you should decide whether you want to buy individual parts and build your own draft beer system, or buy a kit that has all the parts. The problem with most draft beer system kits is that they come with a CO2 canister and regulator. If you already have a kegging system operational, then this is an expensive part that you have already paid for. In this case, you will want to buy the individual parts and assemble your own version of one of these kits.
Once this is done, the next stage is looking for a refrigerator that will accommodate your needs. Half sized refrigerators with top opening lids are ideal, as they take up little space, and the right models can hold up to four kegs. They require a little more building into because often they aren't quite tall enough for your kegs. A regular, full sized refrigerator can also be used. In this case, the draft spigots are mounted through the door of the fridge.
There are just a few problems that folks run into when running their some brewed beer through a draft beer system. Mostly the problems come from not cleaning your beer lines properly. If the beer starts to develop a strange taste or seems stale, it is vitally important to clean out your lines. Also, you should clean the beer lines on your homebrew draft system kegerator at least once every six weeks. Cleaning the lines every time you switch out the keg is another important practice. Cleaning kits are the easiest way to clean your kegerator, and they are easy to use.
A home brewed beer cleaning kit basically hooks up to your kegerator and pumps water through your lines, cleaning stale beer residue from them. The kits can also be used to sanitize your draft beer system. To use a beer line cleaning kit, first, turn off the CO2 tank and take the tap off the keg. Then, after removing the draft spigot and rinsing all the parts, put the cleaning attachment on at the shank-coupling nut. Just place one end in a bucket of water and pump water through the line. I would recommend pumping water, then an Iodophor solution, and then water again through your lines to ensure full sanitation, and many some beer line cleaning kits have sanitation chemicals that come with them.
Another useful tip is to keep it cold! After going to the trouble of assembling a draft beer system for your home brewed beer, keep it on or bacteria may creep in. Keep it cold and clean, and your beer will remain fresh and tasty for four months. Usually, my home brew doesn't last that long unless I go to extreme pains to protect it.

Komos
 Summit
 Beverage-Air
 DCS
DCS
 Marvel
 Perlick
 Bull
Bull
 Avanti
 Danby
Danby
 CM Becker
 Continental
 Fagor
Fagor
 Cal Flame
 Twin Eagles
 Frigidaire
 Fire Magic
 GrowlerWerks
 Hestan
 Igloo
Igloo
 True
True
 Intertap
 Kegco
Kegco
 Keggermeister
 Koolatron
 KegLand
 Krowne
 Krups
Krups
 Lynx
Lynx
 Maxx Cold
 Micro Matic
 Midea
Midea
 Nor-Lake
 Nostalgia
 Arctic King
 Synek
Synek
 Taprite
 Turbo Air
 UBC Group
 Value Series
 Versonel
 VinoTemp
 New Leaf