When converting a regular refrigerator or freezer unit into a kegerator, the first thing you should consider is how to locate the refrigerant lines. The biggest task ahead of you when doing a conversion like this is drilling holes in the fridge in order to mount your beer faucet shank. You may also be needing to drill a hole for external CO2 tank tubing or a temperature probe. Refrigerant lines are the one part of your fridge which you do not want to mess up. Puncturing or nicking the refrigerant lines with your drill bit may end your kegerator project before it even begins. We will look at some simple approaches which will help you to avoid damaging these lines.
Before Your Drill
Step 1 - Clean the outside of the fridge
Step 2 - Make a thin mixture of cornstarch and alcohol
Step 3 - Brush the mixture over the area you want to drill
Step 4 - Turn the kegerator on to its coldest setting
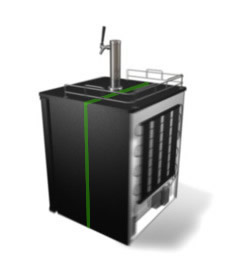
Step 5 - You will see a ghost of the cooling coils after 10-20 mins
Step 6 - Don't drill in that spot
Time to be careful
First of all, what do they look like? Refrigerant lines look like copper tubing and are usually mounted on all sides of a fridge except the doors. The lines are usually mounted just outside of the plastic liner of the unit, in between that liner and the insulation layer. I say "usually" because there are so many fridge units out there, by many differing brands, not to mention models. So, really, you have to use a combination of research and the appraisal of the 'practical eye' to determine where the refrigerant lines lay on the unit you are working on.
Generally speaking, the door or opening lid of the fridge is the most fool-proof location for mounting your beer faucet shank. 90% of full sized kegerator conversions use the door mount because, on most fridge, there are no coolant lines in the door - it is just simply filled with insulating foam. To make sure this is the case with your unit, you can check the hinges. If there are no tubes running into the door, then the door is probably free of refrigerant lines. If there is a tube running into the door, or if the hinges are bulky enough that you think they might harbor a coolant line tube, you should definitely remove the plastic liner on the inside of the fridge before any drilling occurs.
To remove the inner plastic lining, you will most likely only need a screwdriver or two. On some models, you may have to remove the door of the keg fridge in order to get at the lining's mounting screws. If this is the case, be aware that the hinges may be spring loaded, and may burst apart as you take those hinges off. Be ready to catch the screws, pin, and spring as you operate on the hinge.
If you are working on converting a smaller keg fridge to kegerator use, you may want to have a tower style draft faucet. If this is the case, you have two ways to go: you either choose a top lidded unit or a side door unit. If you have chosen the former, you will have a slightly easier conversion, but loading and re-loading kegs will be more of a chore. The lid will most likely have no refrigerant lines running through it, but always use the 'practical eye' test and look at those hinges. If you are using a side door model with a tower style beer dispenser, you will have to remove the inner plastic lining to see where the refrigerant lines run. You must be able to see the refrigerant lines to determine where to drill your beer faucet shank hole. Once the lines are revealed, choose a spot where you will have at least a 1/4" clearance around the 1" hole that the shank will be mounted through.
The beer faucet shank is a piece of threaded tubing that is fitted on the ends with couplers. One end is for mounting your beer line coupler, and the other end is made for mounting your choice of beer faucet. Your beer flows through the shank from the beer line leading to the keg. The whole shank unit is threaded to accommodate mounting through a variable thickness of kegerator door or sidewall, and requires a hollow core 1" hole drill.
Once you reveal the refrigerant lines, it is a good idea to draw a circle with a center point where you are going to drill the shank hole. Drill a pilot hole first, a small hole (1/4" or 1/8") right in the middle of where your shank hole is to be located. Next, use your hole drill bit to drill through the insulation and the outer casing of the refrigerator. Only now is the time to replace the inner plastic lining of your fridge. Once this is done, you should now drill down through the hole you already drilled from underneath. This will cut a hole through the plastic lining you just replaced, completing the shank hole. Now, you are almost done with your kegerator conversion.

Komos
 Summit
 Beverage-Air
 DCS
DCS
 Marvel
 Perlick
 Bull
Bull
 Avanti
 Danby
Danby
 CM Becker
 Continental
 Fagor
Fagor
 Cal Flame
 Twin Eagles
 Frigidaire
 Fire Magic
 GrowlerWerks
 Hestan
 Igloo
Igloo
 True
True
 Intertap
 Kegco
Kegco
 Keggermeister
 Koolatron
 KegLand
 Krowne
 Krups
Krups
 Lynx
Lynx
 Maxx Cold
 Micro Matic
 Midea
Midea
 Nor-Lake
 Nostalgia
 Arctic King
 Synek
Synek
 Taprite
 Turbo Air
 UBC Group
 Value Series
 Versonel
 VinoTemp
 New Leaf


