Here are 6 Steps to Build a Kegerator
So you've decided to build a kegerator. This is going to be fun! With a few hours work and a couple of tools you will have your favorite kegged beverage on tap in no time and you might even save a little money.
Quality ready-made kegerators are available for purchase and no DIY skills are needed, but start at around $499. If you already have an extra refrigerator or can get one really cheap then you can save some money installing a kegerator conversion kit.
There are a few basic kegerator styles you can go with if you want build your own. Kegerator conversion kits can be purchased that will fit almost any type of refrigerator or freezer you might have. A full size refrigerator, compact refrigerator or chest freezer can be modified to hold and dispense kegs, so if you've been asking "How do I build a kegerator?" Here's how...
Choosing a Refrigerator

Full Size Refrigerator
This is the basic refrigerator with a top freezer and bottom fridge configuration used most for kegerator conversions. You can also use a french door (side-by-side) style refrigerator.

Compact https://www.kegerators.com/articles/how-to-build-a-kegerator/ Fridge
A low profile and small footprint refrigerator that can hold various size kegs. Faucets can be mounted through the door or a draft tower can be installed on the top.

Chest Freezer
A freezer modified with a thermostat controller and wooden collar to store and dispense multiple kegs. Most often referred to as a "Keezer" by homebrewers.
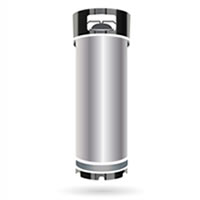
The first thing to consider with the fridge or freezer you choose is the size kegs you plan to dispense out of it. Refrigerators and freezers come in many shapes and sizes, so knowing what kind of kegs you plan to dispense will help you choose a refrigerator with enough space to accommodate the keg height and diameter.
Most common keg types and their sizes
| � |
 |
 |
 |
 |
 |
| � |
Home Brew
(Cornelius keg) |
Sixth (1/6th) barrel |
Short Quarter
(1/4) barrel
"Pony Keg" |
Slim Quarter
(1/4) barrel |
Half (1/2) barrel |
| Capacity |
5 gallons
640 oz
53 x 12 oz glasses |
5.23 gallons
669 oz
55 x 12 oz glasses |
7.75 gallons
992 oz
82 x 12 oz glasses |
7.75 gallons
992 oz
82 x 12 oz glasses |
15.5 gallons
1,984 oz
165 x 12 oz glasses |
| Height |
25" |
23.3" |
14.8" |
23.3" |
23.3" |
| Diameter |
8.5" |
9.25" |
17" |
11" |
17" |
| Weight (full) |
49 lbs. |
56 lbs. |
81 lbs. |
81 lbs. |
161 lbs. |
Full Size Refrigerators
Many people have an extra "garage fridge" for holding spillover frozen foods or drinks. This is a great fridge to modify into a kegerator. These are usually full size refrigerators with top freezer compartments or side by side. Either can be transformed into a kegerator. You can mount the taps on the side of the fridge or straight through the door and use the refrigerator as normal when you don't have any kegs to dispense. If you mount the taps on the front (through the door) make sure you mount them low enough so your tap handles aren't in the way of the upper freezer door. You can also attach a bracket to connect the fridge and freezer doors together. This way you don't have to worry what height you mount the taps. The fridge and freezer door will open together.
Many DIY kegerators can benefit from a temperature control switch to bypass the refrigerator's thermostat controls. Most temperature control switches are equipped with LCD display to show you the current temperature which is an added bonus. The larger full size refrigerators can also be painted with chalkboard paint to give you an instant menu board.
Again, the big advantage to a full size fridge kegerator build is space. On some full size refrigerators you may have to level out the floor by building a platform out of wood. Once the base is level you can store kegs, bottles, cans or even ferment beer inside.
Pros: Full size refrigerators are much larger than compact style refrigerators and can hold more kegs, a larger CO2 tank and can hold chilled glassware.
Compact Mini Refrigerators
You might be strolling through a hardware store one day and see a great deal on an open box or scratch and dent mini fridge. You think to yourself "I could totally make this into a kegerator" and you would be correct. Open up the fridge and make sure it is a freezerless type. The freezer compartment you see in many small fridges will be in the way of the kegs.
The Danby Compact Mini All Refrigerator is the most commonly used DIY compact mini refrigerator for kegerator conversion. It is around 4.4 cu ft. of space and does not have an upper freezer compartment. It requires a little modification of the inner door frame to fit two kegs inside, but the project is not that hard. We modified one in this step-by-step Kegerator On a Budget build story. The one in that project actually did have a freezer compartment and we carefully bent it down without breaking the coolant line.
You can mount taps through the door of a mini fridge just like you would in a full size refrigerator. The only thing you need to factor in is how far the door shanks protrude inside. You don't want them hitting the kegs and not allowing you to close the door all the way. The alternative is to mount a draft tower on the top of the fridge.
Pros: Compact mini refrigerators have a much smaller footprint and can hold 2-3 slim kegs depending on the size unit you get. Mini refrigerators are easier to move around and you have the option for door taps or tower taps.
Chest Freezer (Keezer)
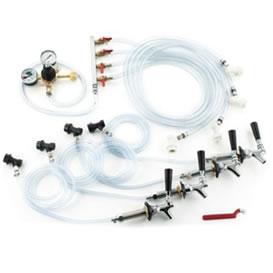
Keezers are a homebrewer's spirit animal. A chest freezer kegerator is a great option if you want to have more than 4 beers on tap at one time. Some homebrewers have up to 10 beers going at a time, so having the ability to choose any size chest freezer needed to house your kegs makes this a perfect choice for brewers.
With plenty of space inside to hold your air tank and regulator, many homebrewers add primary and secondary regulators to their keezer. The primary regulator sets the global pressure and then the secondary regulator allows you to turn down the pressure on each keg line if needed depending on the beer style being dispensed.
A wooden collar is built between the base freezer unit and the freezer lid to increase the height and allow for the kegs. The lid is then mounted back onto the wooden collar. A thermostat controller is used to bypass the factory freezer thermostat and regulate normal serving temperatures. The drawback, for some, on the keezer style is that you must be able to lift the kegs up over the collar and into the freezer.
Keezer Tip: When shopping around for a chest freezer you can take a few cardboard cutouts to match your keg diameter and place them down inside to see how many kegs will fit.
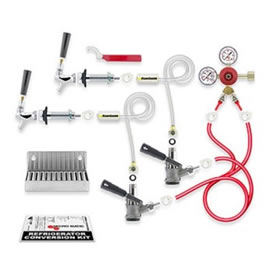
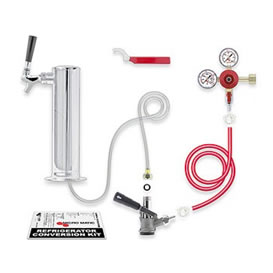
Pick a Kegerator Conversion Kit
Once you have decided which type of refrigerator you will be using for the kegerator build, you can select an appropriate kegerator conversion kit. There are a number of kits available, varying in number of taps, air tank sizes, drip trays, towers, regulators, etc.
Depending on what equipment you may have already (maybe a CO2 tank and kegs?) you should choose the kit to match your fridge. Note that most kits you buy will be put together with lower quality components like chrome plated faucets. These kits are really made for entry level (first-time) kegerator owners to save money. If you want something that lasts longer than a year or two, I would suggest buying all of the necessary components separately and choosing higher quality parts made of stainless steel versus chrome plated. These stainless steel parts will last you much longer and you'll thank me later.
Here is the essential equipment list you will need for practically all kegerator projects.
These items can be bought separately allowing you to choose the quality of each part, but if you don't really care or are in a hurry you can just purchase a kegerator conversion kit that contains everything you need.
It is HIGHLY RECOMMENDED that you purchase a beer line cleaning kit at the same time you purchase your kegerator conversion kit. It is wise to clean your beer lines thoroughly before firing up your kegerator in earnest.
There are a few specialty tools needed to make your kegerator conversion. It is inescapable that you will need to drill holes into your fridge in order to mount your draft spigots or tower. A drill attachment called a hole saw can drill through fridge materials quite easily, and is available at most hardware stores. All in all, you will likely need the following list of tools:
1 Power drill
2 1" and 3" hole saw bits
3 Phillips and flat head screwdrivers
4 1/8" drill bit
5 Pliers
Modify the Refrigerator
Once you have your kegerator conversion kit, it is time to begin!!! The first step is thoroughly cleaning and sanitizing the fridge that you are converting. Remove the shelves, if there are any, and if the floor of the fridge is not flat and level, you should build an elevated floor that is flat and even. Modifying the fridge (drilling holes through it) will obviously void any warranties, so make sure you are committed before you make your first cut.
UPRIGHT FRIDGE
Now, if you are building an upright kegerator conversion, drill a 1/8" pilot hole for the Shank holes. Make sure that the pilot hole goes all the way through the door or side wall that the faucets will be mounted on. The faucets should be elevated sufficiently to clear the keg if mounted on the door and centered.
Next, you will drill a hole using the 1" hole saw on the outside of the door for the shanks to go through. Drill a larger 3" hole from the inside of the door, using the larger bore hole saw. Into this hole fit your shank through the door with the flange against the outside and the nut tightened onto the inside of the panel door. The larger hole on the inside will facilitate the tightening of the shank nut.
CHEST FREEZER (KEEZER)
Using a chest freezer is a good option if you want more than four kegs on tap at one time. Building a wood collar (with 2x6"s) between the freezer top and bottom gives you a place to drill for shanks and faucets without having to worry about hitting coolant lines.
A temperature controller is a good investment on any kegerator, but they become essential in a keezer build. The temperature controller will bypass the freezer thermostat, allowing you to set the temperature to your desired serving temperature.
MINI FRIDGE
You can choose between door mounted faucets or install a draft tower on the top. If you decide to install a draft tower on the top you will need to be exceedingly careful of coolant lines. Should the coolant lines be ruptured, you will need to start over with a new mini-fridge.
TIP: Make a paste solution from corn starch and rubbing alcohol that you can rub over the top of the kegerator. Plug in the fridge and allow it to run for a few minutes. The heat from the coolant will cause the alcohol to evaporate and reveal where the lines are running.
Install the Kegerator Kit
Most kegerator kits you buy will have full instructions on how to assemble the various parts and install them on your fridge. For full size refrigerators with door-mount faucets, you will simply run the shank through the door and tighten the nut down, connect faucets and lines from the shank to the keg coupler and install the air line from the keg coupler back to the air tank regulator. The basic process is the same for the keezer build.
For a mini fridge with draft tower, you will mount a draft tower on the top and run the lines down inside the unit though the hole you drilled during modification. You can use a plastic flange (found at any hardware store) on the inside of the unit to screw the tower down into with screws and nuts for more support. Connect your beer line from the tower shank elbow back to the keg coupler and then connect your air line from the keg coupler back to the air tank regulator.
Installing the drip tray in either kegerator style is relatively simple. For a kegerator with door mounted faucets, use a drip tray with mounting bracket to mark out the mounting holes and drill them. Most styles of drip trays are mounted with Phillip's head screws. For a tower style mini-fridge, I recommend a self contained spill tray that is manually emptied. Now, after installing the drip tray, all you have to do is hook up the beer and gas lines, flush them and sanitize them. Make sure that all hose clamps are tightened and that the CO2 tank is secured and the regulator set to 5-8 PSI.
If you have elected to keep your CO2 tank outside of your kegerator, you will need to drill an additional hole through the back and seal around the CO2 line with silicone sealant or rubber grommet. Once again, you will need to be exceedingly careful not to rupture any coolant lines during this process. For a top opening design (keezer), you may have room to facilitate the exit of the CO2 line in a relatively undetectable area from the rear side of the lid. If utilizing a collared design, you can drill through the collar for the exact size of your CO2 line.
Tap the Keg and Pour!
Not sure how to tap a keg? Here's 5 steps to becoming a keg tapping expert.

Komos
 Summit
 Beverage-Air
 DCS
DCS
 Marvel
 Perlick
 Bull
Bull
 Avanti
 Danby
Danby
 CM Becker
 Continental
 Fagor
Fagor
 Cal Flame
 Twin Eagles
 Frigidaire
 Fire Magic
 GrowlerWerks
 Hestan
 Igloo
Igloo
 True
True
 Intertap
 Kegco
Kegco
 Keggermeister
 Koolatron
 KegLand
 Krowne
 Krups
Krups
 Lynx
Lynx
 Maxx Cold
 Micro Matic
 Midea
Midea
 Nor-Lake
 Nostalgia
 Arctic King
 Synek
Synek
 Taprite
 Turbo Air
 UBC Group
 Value Series
 Versonel
 VinoTemp
 New Leaf